In the information age, data security and availability are crucial. While ensuring data security, it’s equally important to keep data readily accessible and promptly updated through timely synchronization—and maintaining multiple backups is highly beneficial. For individuals, carrying a USB flash drive or an external hard drive can be one solution, but if these devices are accidentally lost, the resulting losses can often be unbearable. As a result, setting up personal private storage has emerged as a viable solution to address this challenge.With personal private storage, data can not only be downloaded anytime for use, but also uploaded and backed up to your private cloud storage at any moment—plus, you can even save multiple versions simultaneously or build your own private media library. All these features are made possible by a specialized device known as a NAS.NAS can either purchase professional equipment or set it up yourself. If you have a software router device, you can achieve everything you need by installing a NAS service system. Before that, however, you’ll first need to establish some basic infrastructure, such as the PVE virtual system and the LEDE software router system.1. Factors to Consider When Choosing Hardware and Software for a "Soft Router"Searching for "soft router" on Taobao brings up numerous products that are largely similar—performance and features vary depending on the processor, memory, and hard-drive space. Additionally, network and USB ports are important factors to consider. A key processor specification to look for is V-D support, which stands for virtualization direct-pass hardware technology. This is crucial for virtualization and overall performance. If you plan to use virtualization features, it’s recommended to start with at least 4GB of RAM. As for USB ports, two is the minimum, while four is the maximum—adding more than that typically won’t make much practical difference.As for the display interface, it’s mainly divided into two types: HDMI and VGA. The soft router uses an industrial-grade motherboard design, allowing it to run continuously 24 hours a day, seven days a week. Since the display interface is only needed during the initial installation and setup process, you don’t have to worry too much about which one to choose—just pick the cheaper option that suits your needs.If the software can be installed independently, there’s no need to hesitate—otherwise, you should consider opting for a pre-installed soft router device. There are two popular virtualization systems to choose from: ESXi and Proxmox VE (PVE). While ESXi requires a legitimate license, PVE is open-source and completely free. In terms of features and performance, PVE generally outperforms ESXi. However, since ESXi is developed by VMware, it’s more widely adopted—even though counterfeit versions dominate on platforms like Taobao.Of course, the J1900 processor, which doesn’t support virtualization technology, still delivers adequate performance for light usage. And even without a virtualization system, running LEDE directly provides a solid user experience.2. Reasons for Choosing the 3865U Processor and the PVE+LEDE SolutionTo support virtualization, we decided to move away from the J1900 and instead choose between the J3455 and the 3865U. While other processors also offer virtualization capabilities, the 3865U ultimately stood out due to its price advantage. As for why we selected PVE as our virtualization system, it comes down to one key reason: it’s free yet delivers excellent performance. When it comes to choosing LEDE, there are two main reasons—first, it boasts a rich ecosystem of software applications and abundant resources; second, its security far surpasses that of the Aikuai system, making it clear that no one would risk compromising their private data.While four-port soft routers are most common on Taobao, they’re insufficient for personal use. That’s why I plan to use the soft router as my main router—my home already has several devices like set-top boxes and other gadgets—so a six-port model is the best fit. One port will connect to the optical modem, another to the wireless AP, one more to the TV, one to the computer, and yet another to the set-top box. This leaves just one spare network port for redundancy.3. Brief Steps for Installing PVE and LEDEDownload the latest version 6.1 of Proxmox VE from: [https://www.proxmox.com/en/downloads/item/proxmox-ve-6-1-iso-installer]. After downloading the ISO file, use a tool to write it to a USB drive, or on a Linux system, simply run the following command:#dd bs=1M if=ISO_file of=/dev/XYZ
Here, "ISO_file" refers to the complete filename of the downloaded ISO file, and "XYZ" is the device name of your USB drive in the Linux system. Compared to a bunch of tools like UltraISO available in Windows, this single command always gets the job done seamlessly.Insert the USB wired keyboard and the prepared USB drive installation media into the soft router’s USB port, then power on the device and press F11 to select booting from the USB drive. Follow the on-screen prompts—simply press Enter at each step—and you’ll successfully install the PVE virtual system. Be sure to set a strong root administrator password during the process.Once you’ve downloaded the LEDE system package—typically with a .tar.gz extension—make sure to extract the .img file. Then, copy this file into your PVE virtual machine to prepare for installing the LEDE software router. There are two methods to do this: one is using WinSCP software under Windows, and the other is by running the `scp` command in Linux.#scp lede.img root@IP:/tmp
Here, we assume the LEDE system file is named lede.img; this command also works on Windows 10.
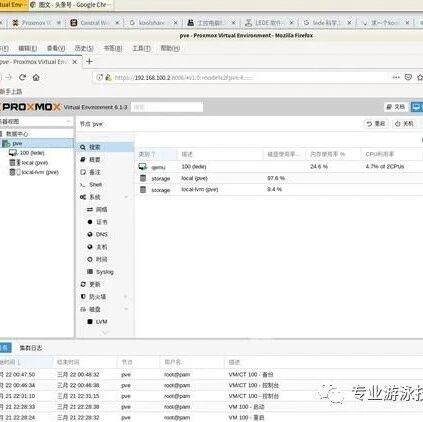
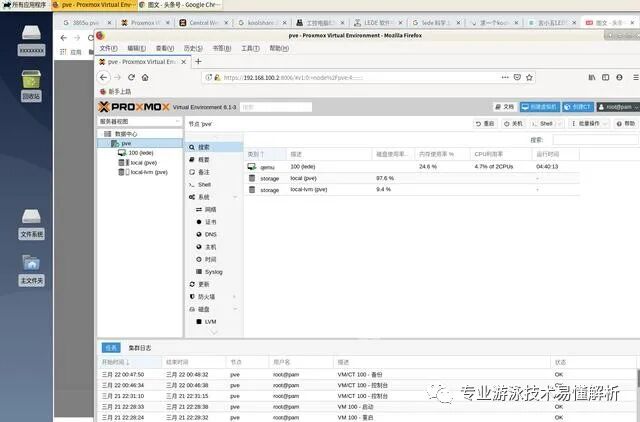
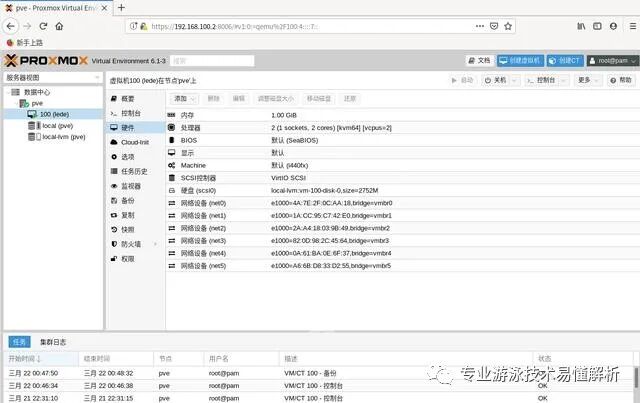
Next, enter https://IP:8006 in your browser to access the PVE virtual system login interface. Replace "IP" with the IP address that was displayed after you installed the PVE system earlier.After successfully logging in, create a new virtual machine within the PVE virtual system. By default, the VM will be numbered 100. Choose Linux 5.x-2.6 as the guest OS, allocate 1 GB of memory, and configure the processor settings based on your hardware specifications: select "1 Socket" if you have one processor, and set the number of cores equal to the actual number of processor cores available.
For example, take the 3865U processor—since it features just one physical processor with two cores, you’d set "Socket" to 1 and "Cores" to 2. Additionally, there’s a wide array of processor feature toggles available for selection, such as AES support; however, leave all these options at their default values.
If the processor configuration isn’t set correctly, the virtual machine won’t boot and will instead display an error message stating, "no vncproxy." Unfortunately, this specific issue hasn’t been clearly explained in other articles online.After setting up the virtual machine according to the instructions, delete the virtual machine’s hard disk by selecting the hard disk under the VM’s hardware settings and clicking the "Detach" button on the toolbar. Then, SSH into the PVE virtual system and load the previous `lede.img` file as the VM’s new hard disk. Once done, an unused hard disk will automatically appear under the VM’s hardware settings, with the same filename as the one generated after the command was successfully executed.#ssh root@IP to log in to the PVE virtual system; replace IP with the IP address assigned after installing the PVE virtual system
#qm importdisk 100 lede.img local_lvm Import the img system file as a virtual machine disk
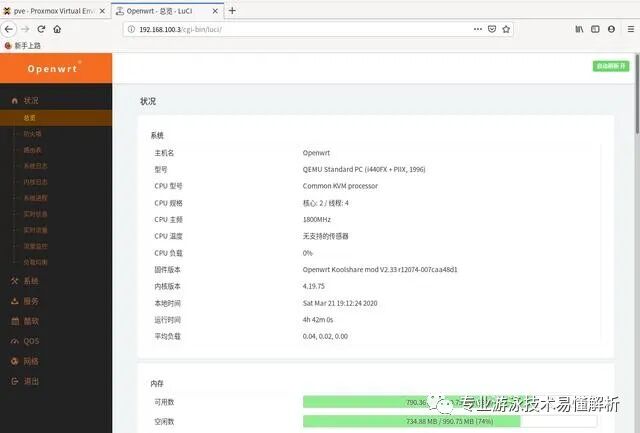
Once the hard drive has been successfully reloaded in the virtual machine hardware, click "Expand" on the toolbar to increase the hard drive size.Up to this point, the installation of the virtual systems PVE and LEDE soft router has been completed.