Grip Technique and Wrist Structure
From the moment beginners pick up a tennis racket, players often hear how crucial proper grip technique is—but for various reasons, they just can’t seem to get it right. Despite striving relentlessly to improve rotational speed, building muscle strength, and constantly refining their technical movements, progress remains frustratingly elusive. Who would have guessed that something as seemingly minor as the grip could actually be holding back their technical advancement? It’s a truly disheartening reality.
Pitfall Guide
Learning all aspects of tennis technique begins with the grip, and in mastering the basic grip, it’s essential to avoid imprecise methods that reverse cause and effect.
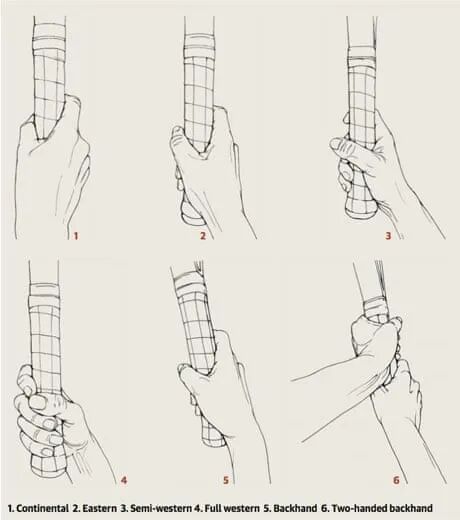
What is "non-precise" technique? For example, descriptions like "chopping-style" or "hammer-style" for the continental grip. Or take this: when a tennis racket is placed flat on the ground, picking it up immediately puts you in the Eastern grip position. This kind of description is highly individual—players practicing for even a short time will realize: even though we’re both using the continental grip, why does my way of holding the "chopping knife" feel so different from how someone else holds theirs? (Laughs!)
What is causal inversion? For instance, consider the widely circulated "Tiger Mouth Alignment" versus the "V-Shaped Alignment." Players who think carefully will realize that it’s actually the palm—specifically the palm’s center—not the back of the hand that makes actual contact with the racket. These two descriptions mistakenly infer the cause based on surface-level outcomes, which is hardly advisable.
(If you align the "thumb-index finger V-shaped area" shown in the diagram with the edge of the racket, the grip motion can easily become distorted.)
Precise positioning
The author believes that adopting the "index finger knuckle base-to-palm heel pad alignment method" is the best choice for learning how to hold the racket properly. Under this technique, the eight angled surfaces of the racket handle are numbered 1 through 8 in a clockwise sequence. Players simply place the base of their index finger knuckle and the heel pad of their palm on the corresponding numbered surface, ensuring they master the correct grip technique every time. For instance, when using a semi-Western forehand grip, the base of the index finger knuckle should align with surface No. 4, while the palm heel pad rests firmly against surface No. 4 as well.
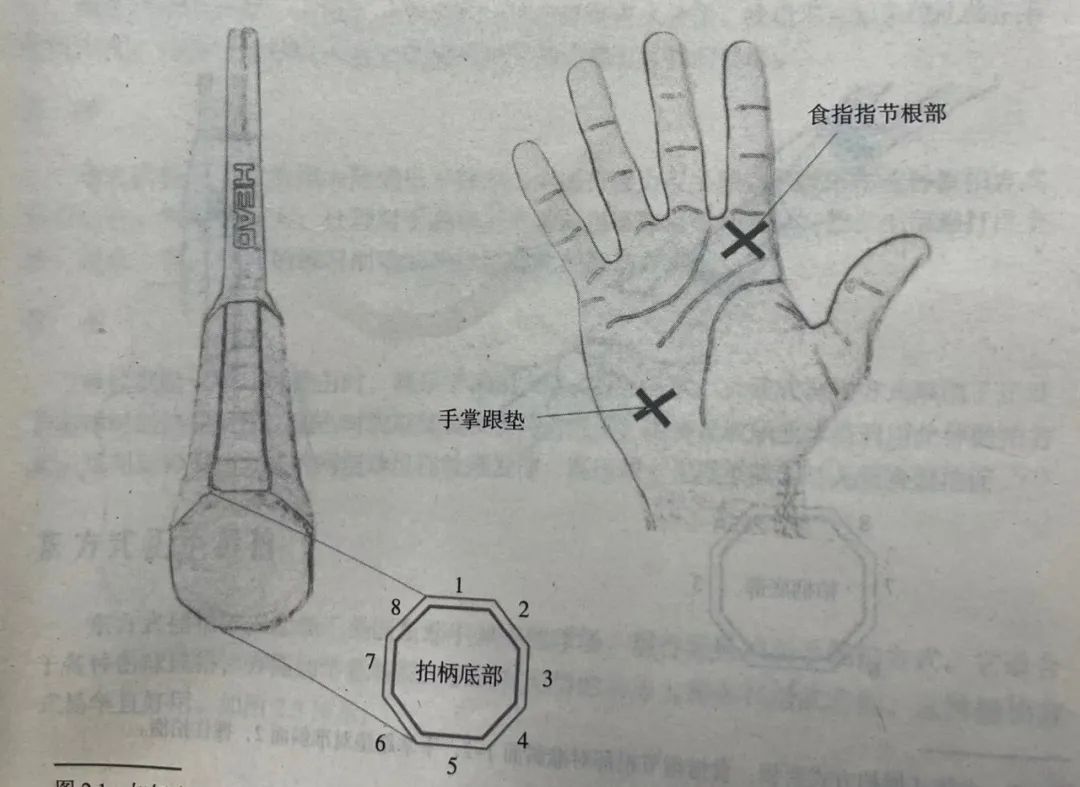
Grip Bevel Numbering and Palm Alignment Points
Although both methods involve the "pinky knuckle-to-palm heel alignment," the tennis community is still divided on this approach. The author doesn’t intend to spend much more time debating exactly which surface the pinky knuckle should align with—instead, a table from Nick’s classic book, *The Tennis Handbook*, is provided here for your reference.
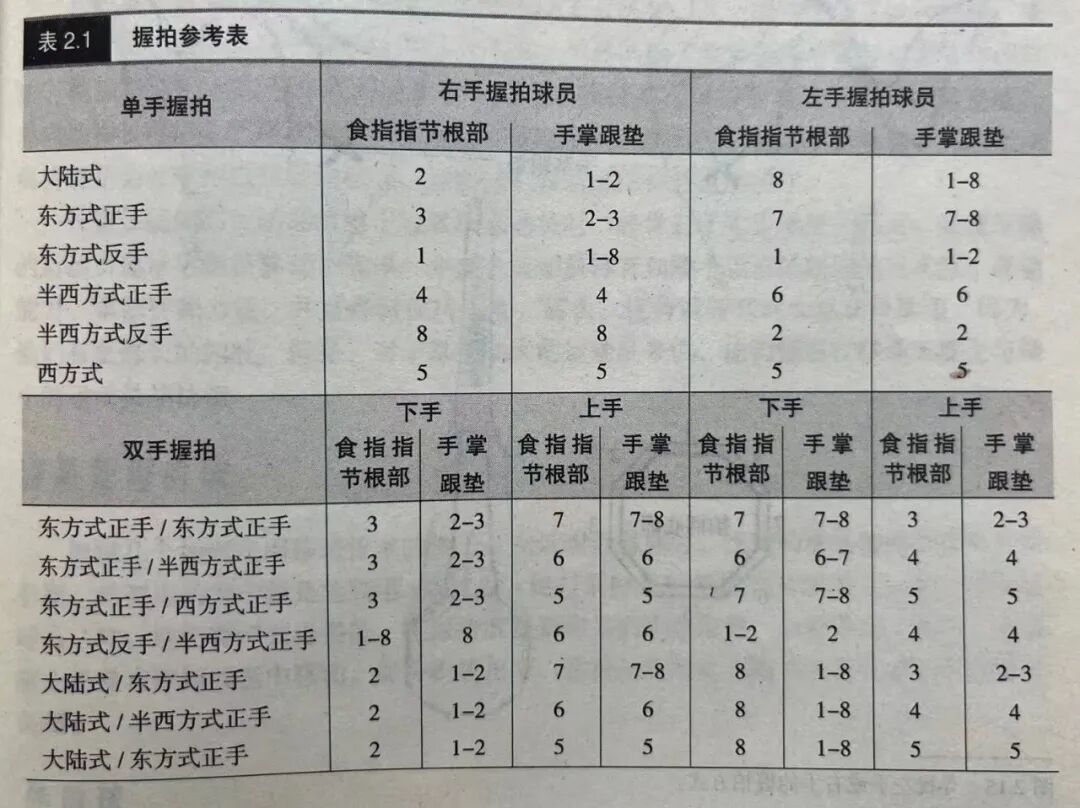
Grip Reference Chart
It’s recommended that you don’t try to memorize all grip techniques at once—just focus on remembering the correct method "precisely" during the learning phase.
This article focuses on analyzing why the index finger's base and the palm's heel pad are chosen as the preferred grip positioning method. This is determined by the anatomical structure of the hand, making it crucial to understand the unique characteristics of the hand’s muscles, bones, and joints.
Wrist joint
First, we will introduce the structure and characteristics of each carpometacarpal joint in sequence; the specific structures can be simply abstracted using the diagram below.
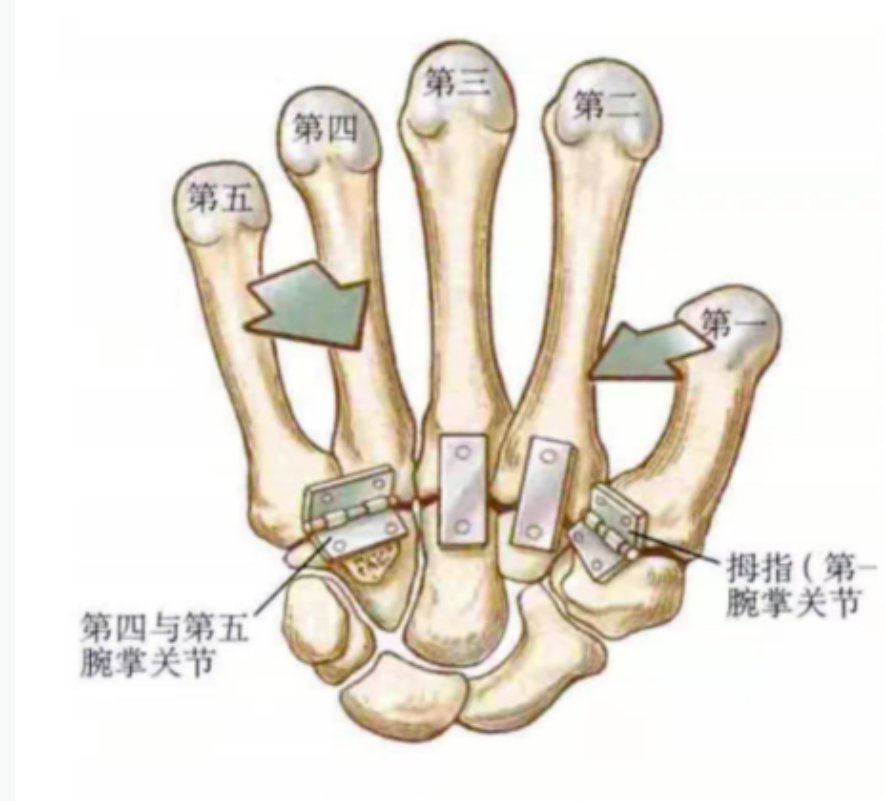
Abstract representations of each carpometacarpal joint
The first metacarpal corresponds to the thumb and is separated from the other four metacarpals. At its base, it connects independently to the carpal bones, creating a joint with considerable mobility—the carpometacarpal joint. The second metacarpal’s base fits snugly into the lunate and triquetrum bones, forming a highly stable carpometacarpal joint. The third metacarpal’s base features a small styloid process that links it to both the second metacarpal and the capitate bone, contributing to an exceptionally stable carpometacarpal joint structure. Meanwhile, the fifth metacarpal’s base has an-shaped (saddle-shaped) configuration: concave on the palmar side and convex on the dorsal side, allowing for the greatest range of motion at this carpometacarpal joint. The fourth carpometacarpal joint also exhibits some degree of flexibility, working in tandem with the fifth joint to gently fold the ulnar edge of the hand inward toward the center. While the fourth carpometacarpal joint is less mobile than the fifth, it remains surprisingly agile.
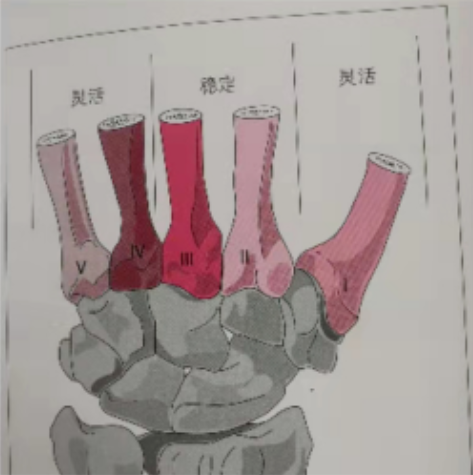
Wrist Bone Mobility Classification
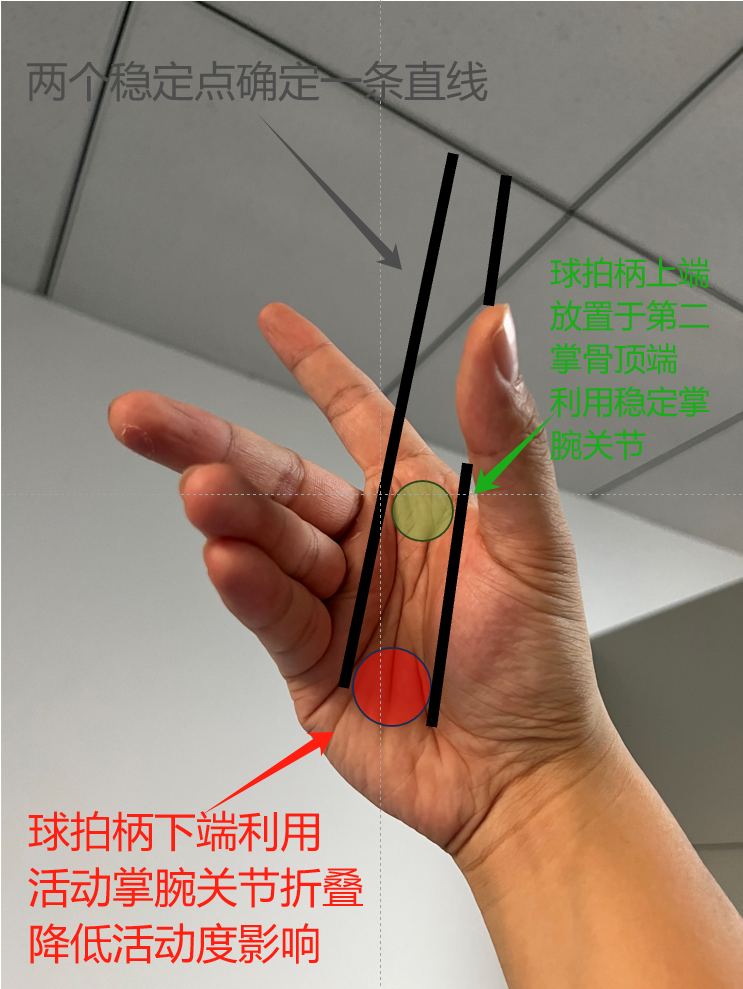
As shown in the diagram above, the second and third carpometacarpal joints provide stable structures, with the second carpometacarpal joint being the most stable. In contrast, the first, fourth, and fifth joints offer greater mobility. When generating force actively, players must leverage the stability of the second and third carpometacarpal joints to maintain overall hand stability, while simultaneously minimizing the impact of increased mobility in the other wrist joints on the structure. Specifically, this is achieved by placing the upper end of the racket handle atop the most stable second metacarpal bone (at the base of the index finger), then using muscular strength to flex the first, fourth, and fifth carpometacarpal joints, effectively locking the bottom of the handle into position—typically between the so-called thumb carpometacarpal joint and the fourth/fifth carpometacarpal joints. The precise technique is illustrated in the figure below.
Seeking profit, avoiding harm (laughing)
If we take the cross-section of the racket as an example, it looks like the figure shown below.
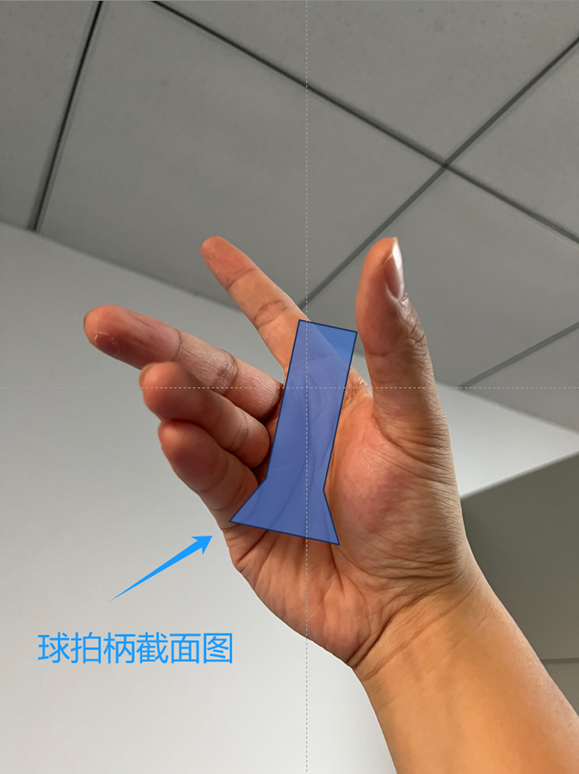
Abstract cross-section of a tennis racket handle
Palmar muscles
The structural characteristics of the palm muscles determine that they primarily act to resist twisting during the grip phase. At the moment of impact, the tennis ball exerts significant torque on the racket, creating a rotational tendency in the racquet.

At the moment of impact, the tennis ball applies torque to the racket, causing it to spin.
To maintain racket stability, players must apply frictional forces in the opposite direction to counteract the racket’s tendency to rotate. Depending on the hitting zone, the racket may exhibit one of two rotational tendencies—but no matter which way the racket is spinning, the palm of the hand needs to generate frictional forces in the exact opposite direction to resist it.
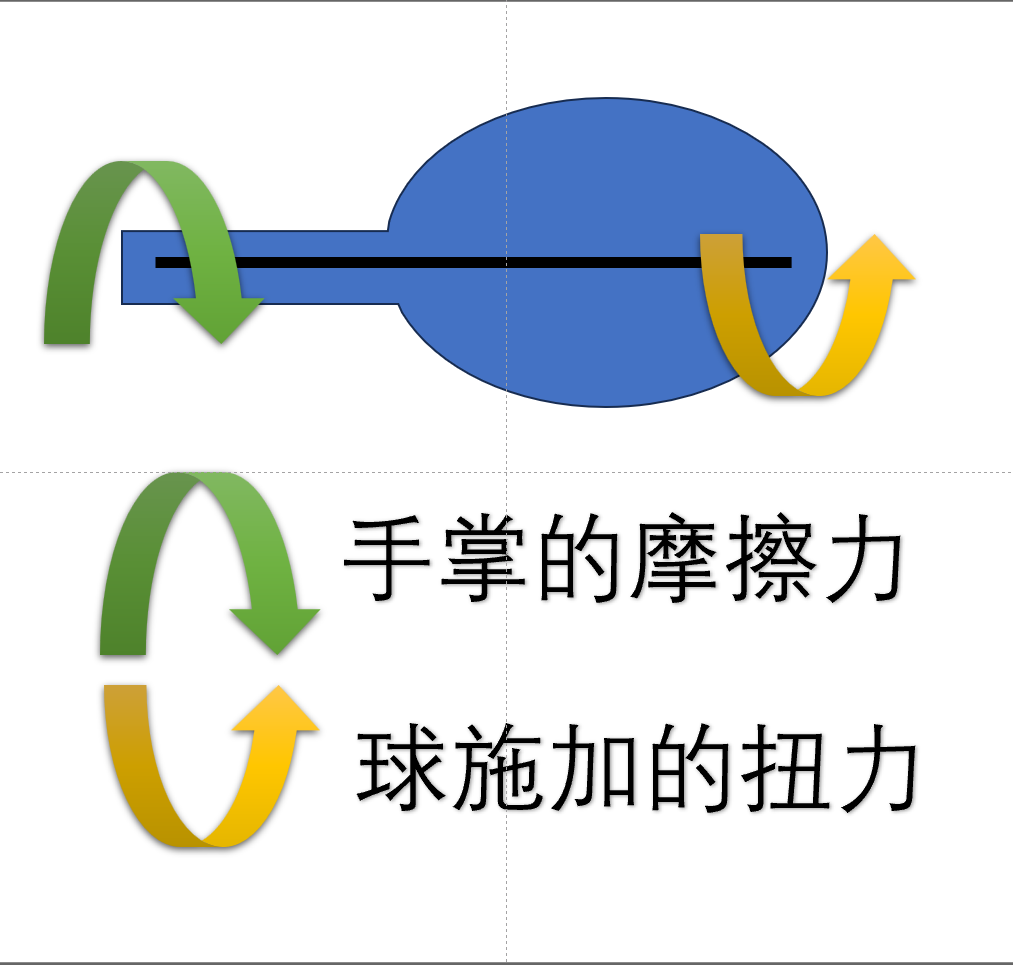
Hand palm friction counteracts the torque applied by the ball.
To increase friction, you need to squeeze the racket using the muscles in your palm. Among these palm muscles, the thenar and hypothenar muscle groups are the most robust and should be used effectively.
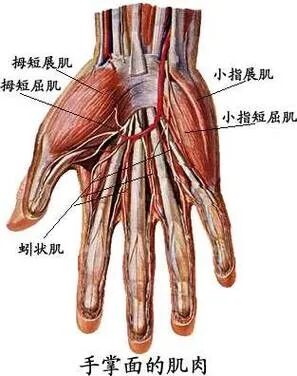
Anatomy Diagram of Hand Muscles
The muscles in the thenar region primarily include the abductor pollicis brevis and the flexor pollicis brevis, while the hypothenar region is dominated by the opponens digiti minimi, the abductor digiti minimi, and the flexor digiti minimi. The thenar muscles generate significantly more friction compared to the hypothenar muscles—but both are equally crucial. Together, the friction produced by the thenar and hypothenar regions, combined with the surface formed by the little finger and ring finger gripping the racket, determines the racket’s ability to effectively resist twisting forces.
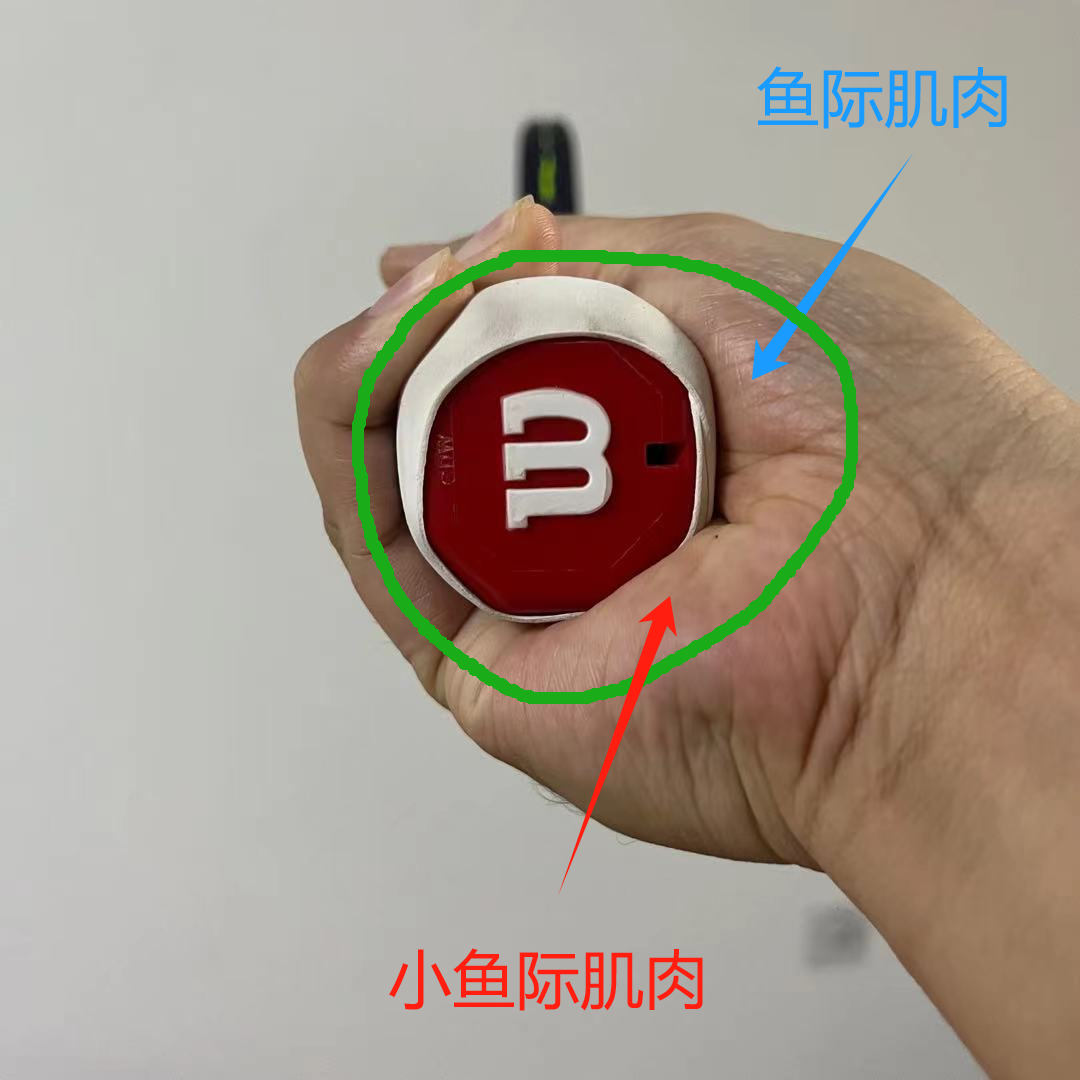
Muscles form a stable, ring-like structure together with the little finger and the ring finger.
At the final stage of the forward swing, as you accelerate the racket through your wrist joint, this circular surface provides crucial support for the racket's leverage—so make sure to grip it firmly.
Conclusion
FirstPlayers should hold and position the racket using the "palm heel pad alignment method—based on the base of the index finger knuckle."
SecondWhen actively striking the ball, the palm and fingers form two distinct ring-like areas, each with varying degrees of tension. Generally, the area of the palm closest to the base of the racket handle is held tighter to provide solid support, while the section nearer the throat of the racket remains looser. However, the knuckle base of the index finger still needs to press firmly against the angled surface, ensuring that the overall force exerted by the palm on the handle is directed squarely toward the intended impact direction.
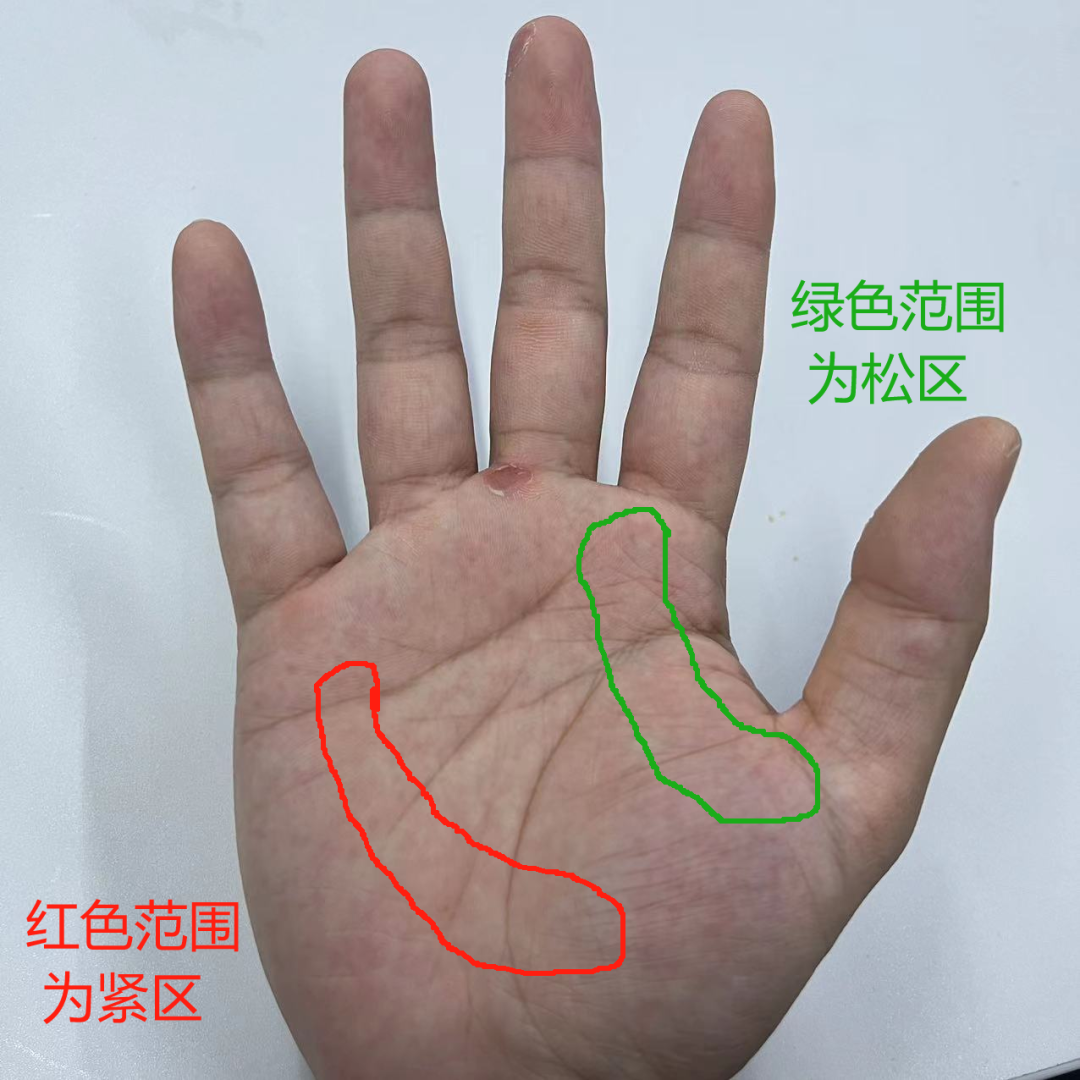
The relative tension relationship between the two annular zones
Third, Players' understanding of the lever principle helps them grasp how the palm provides support and efficiently transmits force in the direction of the swing, ultimately enabling the racquet head at the end of the stroke to accelerate.
(Due to space constraints, the specific analysis of how grip tension affects racket leverage will be detailed in the next installment of our "Getting to the Root" column. We sincerely apologize 🙏)